An ideal python setup for data science & machine learning [using virtualenv]
My data science and deep learning machine toolkit mainly includes the following python libraries :
In this post, I will describe the Python setup on my machine (currently running Ubuntu 16.04). This setup helps me manage my projects and their library dependencies easily. Some projects rely on a specific version of a library. The setup described below takes care of such dependencies too. It is very easy to setup and is highly effecient. This is particularly helpful when multiple users are sharing the same machine.
EXTRA - how to change global default python interpreter to python3
One of the way you can change your default python interpreter to python3 is by appending alias python=python3and alias pip=pip3 to your .bashrc file. You will find this (hidden) file in your home directory and can open it by
$ nano ~/.bashrc
After appending alias python=python3and alias pip=pip3 press Ctrl+O to save changes and Ctrl+X to exit.
To manage all my python libraries I use yet another python library called virtualenv. Let us first study how python packages are organised in your system.
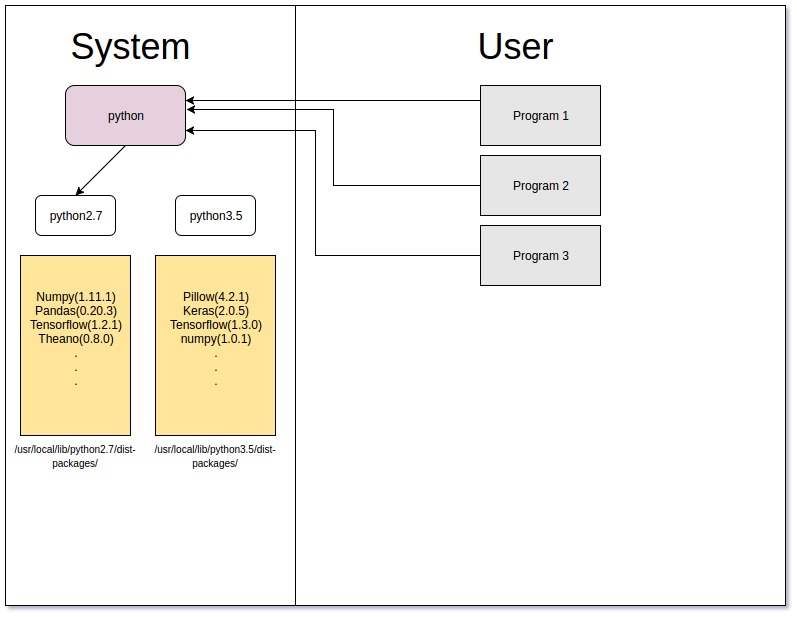
Before

In the above representation of your system, the area in the right represents the user space ie. consider home directory ($ cd ~) and further while the one on the left represents the system space. Ubuntu 16.04 systems come pre-installed with both python 2.7 and python 3.5 interpreters. When you run your programs using python interpreter they point to /usr/bin/python which in turn points to the global copy of the python2.7 interpreter. (Can be changed as shown in the EXTRA section above)
pip is a package manager for python. Your system has a pip2 for python2 and a pip3 for python3. The yellow rectangles in the diagram represent the packages installed for the respective python interpreter. By default pip points to pip2. (Can be changed as shown in the EXTRA section above)
Say you have started working on your first project and you need to install a package, say numpy (just an example for this deep-dive, replace “numpy” with any package you wish to install), you type in:
sudo pip install numpy # Installs numpy for default interpreter
Note: sudo is required because you are adding it as a global package
When you run this command, a version of numpy gets installed globally. Now for every subsequent projects you will use this exact version. Say 3 months down the line, a new version of numpy is available and this update brings major performance benefits along with some API changes. Now you wish to benefit from the performance upgrade for your new upcoming projects but if you choose to install this new updated numpy you risk breaking your existing projects as your previous projects depend on the previous API. You are forced to use an obsolete package in spite of a new updated version of the package being available. This is a MAJOR problem !
Let us now see how virtualenv will help.
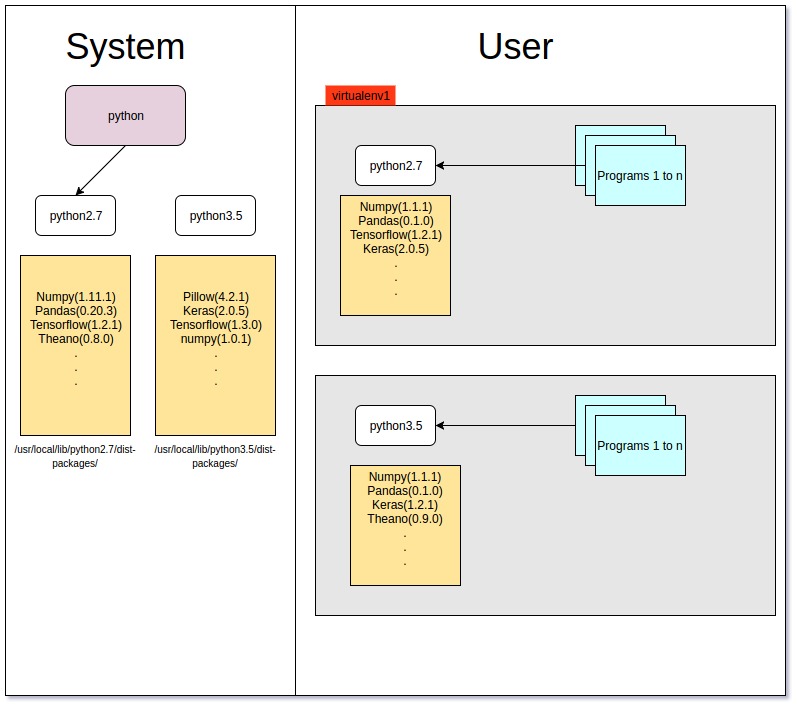
After

virtualenv enables us to create multiple mini-python environments which are isolated from the global python environment as well as from each other. My system currently contains over 23 virtualenvs having python3 interpreter and 4 with the python2 interpreter. YES creating a new virtualenv for every project is overkill but I do it anyway. Each virtualenv has its own copy of packages(You can install different packages/libraries in different virtual environments). This helps alleviate the previous problem. My old project will run in one environment containing an old version of numpy while my new projects will run in another virtualenv which contains the newer verion of numpy. As I am starting my new project I can write code in accordance to the new API and reap performance of this new updated verion.
Let us see steps to setup virtualenv. We will install it as a global library. So,
sudo pip install virtualenv # Installs virtualenv for default interpreter
Note: sudo is required because you are adding it as a global package
Now I will cd into my project directory. Then I will execute:
$ virtualenv venv # “venv” is the name of my virtualenv.
Check my output
abhishek.shirgaokar@tech:~/workspace$ mkdir my_project
abhishek.shirgaokar@tech:~/workspace$ cd my_project/
abhishek.shirgaokar@tech:~/workspace/my_project$ virtualenv venv
New python executable in /home/abhishek.shirgaokar/workspace/my_project/venv/bin/python
Installing setuptools, pip, wheel...done.
abhishek.shirgaokar@tech:~/workspace/my_project$
You can make the virtualenv more representative of its purpose by naming it appropriately. Executing this creates a new folder named same as the virtualenv name. This folder contains a local copy of the respective global copy of the python interpreter and is initalized with no packages/libraries installed by default. Now execute:
$ which python
$ source venv/bin/activate	#"venv" is the name of your virtual environment
$ which python
Check my output
abhishek.shirgaokar@tech:~/workspace/my_project$ which python
/usr/bin/python
abhishek.shirgaokar@tech:~/workspace/my_project$ source venv/bin/activate
(venv) abhishek.shirgaokar@tech:~/workspace/my_project$ which python
/home/abhishek.shirgaokar/workspace/my_project/venv/bin/python
(venv) abhishek.shirgaokar@tech:~/workspace/my_project$
which python points to the exact python interpreter which will be used to run python file. The first time you run which python, it shows that it points to the global copy of python. Now you will run source venv/bin/activate, which will make your local copy of the python interpreter as the default interpreter. Notice (venv). This shows that you are now inside the virtual environment. Running which python again verifies that you are indeed using a local copy of the python interpreter.
Now that we are inside the virtual environment we can install packages in a way similar to before.
$ pip install numpy
Notice: We do not require sudo now as we are installing the package inside the virtualenv.
To exit a virtual environment just execute:
$ deactivate
on the terminal. Notice (venv) is now gone which indicates you are out of the virtual environment.
EXTRA - installing a particular version of a package using pip
Open https://pypi.python.org/simple/numpy in your browser by replacing “numpy” with your package of choice. You will now see a list of file representing the latest as well as previous versions of that package.
To install a particular verion of a package, execute:
$ pip install numpy==1.10.2
Here “1.10.2” is the version I choose to install.
EXTRA - creating a matching virtual environment on another machine
Maybe you are a project manager and you have created a virtual environment followed by installing the correct version of certain packages after carefully considering their stability and their inter-compatibility. Now you want to share this setting with your team members so they can easily replicate your setup.
A elegant way of doing this is to run the following on your system:
$ pip freeze > req.txt
This will create a file named “req.txt” containing list of all packages and their exact versions. Now, for those tryinng to replicate your setup, they should create a virtual environment and jump inside it followed by doing a
pip install -r /path/to/req.txt
This will in one command create a exact replica of your environment
I hope this has been helpful enough! Comment below for any topics you want me to deep dive into and simplify.